Engine hunting. No-starts. Running solely on choke. While there are plenty of things that can prevent proper operation of an engine, these symptoms often point to the carburetor. When a carburetor is clean and working correctly, the engine should start easily, idle smoothly, accelerate without stumbling, and run with normal fuel economy.
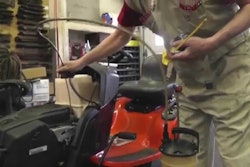
When a small engine does not start, the carburetor is a common culprit. Unfortunately, carburetors can be expensive to replace. But this ever-so-important part commonly requires a bit of TLC rather than an entire replacement. With a few basic tools, a shop towel and a couple of hours, you can clean the carburetor yourself and save time and money.
Treated Fuels
Before we dive into carburetor diagnostics and restoration, let’s get to the bottom of why the problem is occurring in the first place.
The number of problems with carburetors has increased with the introduction of treated fuels such as E10, which contains ethanol. Ethanol, which is pure alcohol, attracts moisture and leads to corrosion inside the fuel tank and carburetor. In addition, if E10 is left inside a small engine for too long, the volatile ingredients will eventually evaporate, leaving a thick, sticky, varnish-like product. This gummy varnish then lines the carburetor bowl and begins clogging up the small jets and ports, making it difficult to burn and posing starting problems.
Even expired gas (fuel that has been sitting for more than 30 days) poured in from a gas can might be dirty or contain rust particles that clog lines and cause problems. The best solution is to drain the old fuel from the float bowl and thoroughly clean the carburetor with carburetor cleaner.
8 Steps to Cleaning the Carburetor Bowl and Jet
Step 1: Remove the spark plug cap so the engine doesn’t fire during maintenance. Then turn the fuel valve to the off position.
Step 2: Some manufacturers incorporate carburetor drain screws in their engine designs. If this is the case with your engine, simply drain the carburetor bowl by removing the drain screw, which is positioned on the outside of the unit. Once gas is drained, take off the bowl by removing the screw that attaches the bowl to the bottom of the carburetor.
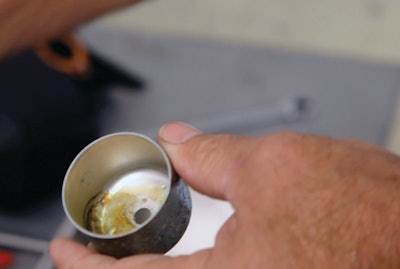
After the carburetor bowl is drained into a container, evaluate the fuel condition. Take note of whether you see rust, dirt or corrosion bits. Generally, if your engine has fallen victim to old gasoline, varnish from stagnant fuel will stick to the bottom of the carburetor bowl.
Step 3: If the carburetor bowl has varnish residue in it, spray the inside with carburetor cleaner and wipe it clean. If the material within the carburetor bowl is still in a liquid state, simply wipe it dry.
Step 4: The main jet’s passage is where fuel flows through the carburetor into the combustion chambers. To inspect the jet passage, remove the jet with a flathead screwdriver. This is a very small brass piece, so be sure you have a pan of some sort to catch it as you remove it.
Step 5: To service the jet and open the passage, spray carburetor cleaner on it and clear out any particles or gummed fuel by passing a wire brush bristle through it. Be careful not to make the passage any larger than its original size. You just need a nice, clean, shiny round hole for gasoline to pass through.
Step 6: Remove all material that could come loose and clog up the jet again by spraying the rest of the carburetor components with carburetor cleaner, making sure to catch overspray from the cleaner with a rag.
Step 7: The idle jet, which might need service, is at the top of the carburetor. Some carburetors’ idle jets will unscrew at the top. Others are pressed in or might be plastic with O-rings to seal them. To clean the idle jet, pass a wire brush bristle through it to be sure the opening is completely clear.
Step 8: Reassemble by placing the main jet back into the carburetor stem with a screwdriver. Make sure it is snug but do not over tighten. Check to see the gasket (either flat or O-ring) that seals the carburetor bowl to the carburetor body is in position and not torn or warped. Tighten the screw and washer that holds the carburetor bowl to the carburetor body. Do not over tighten.
At this point, users should make sure there is no fuel around the carb bowl. To start, pull the engine over a few times.
Digging Deeper
Most commonly, the engine will start up and perform normally after completing this cleaning process. In the event that this doesn’t solve the problem, the carburetor may need to be removed from the engine for more extensive cleaning. If it becomes necessary to remove and clean the entire carburetor, consult the manufacturer’s service manual.
As you begin to take the air filter assembly and carburetor off, take photos of the linkage to remind yourself of how it looks fully assembled. This is especially important if it’s going to be a while before the carburetor is reassembled.
NOTE: The limit cap for the idle mixture screw is on the top of the carburetor. It is part of the tamper-proof system required by the Environmental Protection Agency (EPA). Due to EPA regulations, it is a non-serviceable part. If this part breaks, you’ll have to replace the entire carburetor, so handle this portion with extra care.
Prevention
There are a number of things small engine owners can do to prevent gumming within an engine. The main component to consider is time. How long will your engine be stagnant? Is it your lawn mower taking a rest for the winter, or is this a generator that you likely won’t need for well over a year?
A high-quality fuel stabilizer will do the trick for any engine that will sit idle longer than 30 days, and up to a year. In these circumstances, mix the proper ratio recommended by the fuel stabilizer manufacturer. Fill the tank as full as possible, as air increases the potential for condensation, which leads to corrosion. Once you’ve added fuel stabilizer to the gas tank, run the engine long enough for the fuel to cycle into the carburetor bowl, or approximately 15 minutes.
Manufacturers recommend completely draining the gas if the engine will not be used for longer than a year. Rather than letting your generator sit with a half tank of fuel until the next power outage, twist the carburetor drain screw and drain the fuel. Pull the spark plug and spray some fogging oil on it. Pull the rope a few times, then place the spark plug back in and store it.
Many small engine owners opt for a combination of both of these options. When leaving the fuel stabilizer in the main fuel tank, operators can turn off the fuel valve and drain the fuel from the carburetor or run it until it’s completely dry and the engine shuts off. That way the carburetor bowl has no fuel in it, but you still have fuel in the tank.
As action-packed as the antics of an unruly engine can be, it’s best to prevent the no-starts and engine hunts by taking care of your carburetor issues before more serous issues arise.
Dale Gabrielse is involved in OEM sales and marketing support for Subaru Industrial Power Equipment, Lake Zurich, Ill. In his 17 years with the company, he has been the equipment sales manager, distribution sales manager, and training manager.