
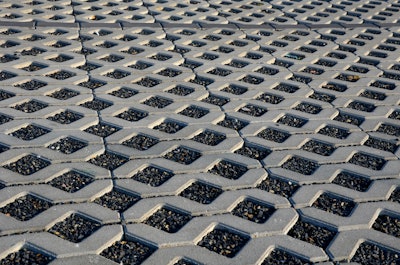
Flexible, plastic porous pavers, installed with grass or gravel, are becoming a popular solution for landscapes and hardscapes that require both durability and excellent stormwater management. Whether you're installing a fire lane, parking lot, garden or trail, success depends on preparation, choosing the right materials, and attention to detail at each stage.
Here are some of the key steps that landscapers, groundskeepers, and maintenance crews should keep in mind when installing porous pavers.
Prepare the Site
Installing porous pavers begins well before the first roll is unwrapped. All adjacent paving, such as sidewalks, driveways or curbs, should be completed first to prevent shifting and to give the grid structure a clean, supported edge. If the area you’re installing is being used as a fire lane, make sure to obtain any necessary approvals from the local fire department. Their standards often include specific requirements for base depth and compaction.
Weather can also make or break a successful install. Avoid working in muddy or frozen conditions and wait for temperatures to rise above 55° F (13° C) to ensure proper handling and performance of materials. If the porous pavers must be stored on-site before the install, cover them well to protect against the elements.
 Invisible Structures
Evaluate the Subgrade
The long-term stability of the installation starts with the condition of the subgrade. Inspect the native soil and check for any areas that feel soft or unstable underfoot—clay or loosely compacted soils may require reinforcement. Depending on site conditions, you might need to include mechanical compaction or use a geotextile fabric for added stabilization.
Additionally, remember that excavation depth should account for the combined thickness of the soil (about 1/2 in.), the porous paver (typically around 1 in.), and the chosen base course, which may vary based on traffic loads. The goal is to get a level, compacted surface that won’t shift or settle under use.
| All depths require an additional +1 in. for product +1/2 in. for sod soil | |
|---|---|
| Pedestrian | 1 in. minimum* |
| Golf Cart | 2 in. minimum* |
| Car/SUV | 6 in. minimum* |
| Trucks | 8 in. minimum* |
| Fire Trucks | 12 in. minimum* |
| H20 Loading | 12 in. minimum* |
Install a Functional Base Course
With the subgrade prepared, the next step is installing a base course that balances structural integrity with drainage.
Before beginning, ensure all underground utilities, such as irrigation or drainage systems, are installed and fully functional. Then, grade the subgrade evenly to ensure it does not exceed the required slope. This is crucial to avoid ponding and allow for uniform compaction. A well-built base helps distribute loads evenly across the grid and supports vegetation health installed over it better.
| Fire Lanes | 5% maximum |
| Cars and Trucks | 8& maximum |
| Golf Carts, Trails | 15 to 20% |
Build a Porous Base Course
This layer serves a dual purpose: it must support surface loads while also allowing water to drain freely into the subgrade. This makes selecting the right base material is essential. A well-graded, porous stone mix that meets specific sieve size requirements is a reliable option. Alternatively, you can create a custom blend by mixing three parts #57 stone with one part concrete sand to achieve both stability and permeability.
| 1 in. | 100% passing |
| 3/4 in. | 80 to 100% passing |
| 3/8 in. | 60 to 80% passing |
| #4 | 40 to 60% passing |
| $10 | 25 to 40% passing |
| #40 | 5 to 25% passing |
| #200 | 0 to 5% passing |
Avoid using clay-based materials or decomposed granite, as these can compact over time and reduce infiltration. If you're working with limestone or other aggregates that tend to lose porosity after repeated water exposure, amend the mix with 30–40 percent sand to maintain long-term drainage performance. If you’re installing porous pavers with grass, choose a base material with a nearly neutral pH, ideally between 6.5 and 7.2 to promote healthy root development. On the other hand, for hardscapes with gravel, consider using a gravel paver with a fabric backing to prevent stone migration and weed growth.
Once installed, compact the base course in 6-inch lifts to at least 95 percent density. Use a hose to test permeability. Water should drain quickly from the surface without pooling. Finally, leave approximately 1 1/2 in. of space over the finished grade to allow room for the paver grid, sand fill, and grass or gravel.
More about paver hardscaping on GreenIndustryProducts.comTips for Choosing Paver Shapes and Patterns - Patio design takes careful consideration of paver styles, colors, shapes and patterns. Sales Process for Selling Hardscapes - Contractors use paver patios and other hardscape elements to help encourage homeowners to upgrade existing landscaping. Clay Brick Pavers vs. Concrete - In defence of the clay brick paver. |
Lay Out the Porous Pavers
After a compacted, free-draining base, roll out the porous pavers over the prepared area. Start by cutting zip ties and unrolling the material with the rings facing up. Connect the pavers well to create a continuous and uniform surface. This step is especially important in load-bearing applications like fire lanes, where full connectivity ensures structural performance.
To pave along curves or edges, use pruning shears to cut the porous paver to shape. Secure any small pieces or sloped sections with U-pins or nails and washers to prevent movement during sand fill and turf establishment.
 Invisible Structures
Fill the Rings with Sand
Before filling the porous paver rings with sand, install any necessary delineators or markers at predetermined locations. For filling, use dry, clean sand and a stiff-bristle broom to fill the rings evenly until the sand is level with the top. Water the surface lightly to compact the sand in place and top off as needed. Once settled, the finished grade should sit flush with the ring tops or up to ¼ inch above the porous pavers’ rings. Add more sand if necessary.
Install the Grass or Gravel
When it comes to a lush landscape, Timely vegetation installation is key. Plant grass within one week of sand filling to minimize exposure to elements and the risk of erosion. Choose a hearty, traffic-tolerant species appropriate for the local climate. For sod, opt for thin-cut varieties grown in sandy-loam soil — they root more quickly and adapt well to porous paver systems. Lay sod or seed evenly across the filled grid, ensuring complete coverage. Press sod firmly into the sand base to encourage good root contact and minimize air pockets.
 Invisible Structures
For applications with gravel infills, it is preferred that the aggregate be clean, sharp, and angular, approximately 3/8 to 3/16 in. size. Pick stone aggregates that will not break down over time, such as granite. Avoid brittle materials like seashells that can break down and cause fine particles to clog the system.
After selecting the aggregate of choice, fill the empty rings of porous pavers until the fill is level with the top. Use a concrete rake to evenly distribute the aggregate in the rings. If you want to hide the rings, overfill by 1/4 in. maximum, however if ADA considerations are important for the project, do not overfill unless a binder, such as cement, clear tree resin or polymer, is used.
Protect Until Vegetation Roots Take Hold
New grass needs time to establish before it can handle regular use. For sod installations, wait three to four weeks before allowing traffic on the paved surface. For seeded or hydroseeded areas, allow six to eight weeks for germination and early root development. During this period, keep the newly paved area off-limits to foot traffic, equipment or vehicles. Monitor the surface regularly, and if sand becomes displaced by rain or irrigation, refill and level it to protect the paver’s grid structure and encourage uniform grass growth.
Short-term Maintenance
A beautiful, green landscape needs consistent care in the early days. Irrigate the grass two to three times daily for the first six to eight weeks unless rainfall is sufficient. You can mow as usual but avoid going too short during this period. Cutting too low can damage young roots and expose the sand. Also, make sure the area receives adequate sunlight. Apply fertilizer only as required but avoid clay-based blends that can inhibit drainage.
Porous pavers with gravel infill need little to no maintenance. If a binder was used, reapply binder as recommended by the manufacturer’s instructions. If no binder was used, rake errant gravel back onto the rings every few months if needed. Refill any low spots to ensure there are no naked rings.
Long-term Maintenance
Once established, the grass will require routine care to stay healthy and resilient. Water regularly, especially during dry periods. Porous pavers can have up to 92 percent void space, which can drain water quickly and hence require deeper watering. Remember, the deeper the base course, the more water may be required to saturate the grass roots. Also ensure that the grass continues to get enough sunlight. Repeated parking or shading in one spot can stress the grass.
Keep mowing and fertilizing on a regular schedule but your choice of porous paver may require you to skip aeration. It is recommended to consult with the manufacturer because traditional turf aeration methods can damage the plastic grid and compromise the integrity of the system. When properly installed, some porous paver systems do not require aeration to maintain health.


![Screenshot 2025 04 02 15315367ed9ef4a98a61 f J Hvy6d3 Wq[1]](https://img.greenindustrypros.com/mindful/acbm/workspaces/default/uploads/2026/06/screenshot-2025-04-02-15315367ed9ef4a98a61fjhvy6d3wq1.R6OQhqU3ti.png?ar=16%3A9&auto=format%2Ccompress&dpr=2&fit=crop&h=135&q=70&w=240)


